Tyler Ferrell is the only person in the world named to Golf Digest's list of Best Young Teachers in
America AND its list of Best Golf Fitness Professionals in America.
Meet your new instructor.
Subscribe now to watch the full video.
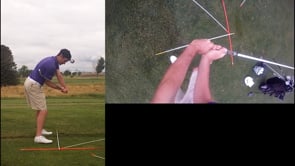
Getting into Delivery Position
- Weight into left heel
- left shoulder down
- chest down
- right elbow in
- wrists set
This is one of the most important moves in the golf swing and one of the biggest differentiations between elite golfers and high handicappers. I like to use the analogy of stepping into a pitch with a lot of my students. The swinging of the club has a lot of similar transition moves to the throw. You want to shift your weight by pushing off the trail foot. It is important that the trail foot pushes off the inside of the foot (toward the target) vs pushing toward the golf ball. When you shift your weight, you want to sequence movement from the lower body first. When the weight shifts, you are going to let your left shoulder stay down and keep your chest down. At the same time you are going to bring the clubhead close to you. To do this, you are going to flex your trail elbow, you are going to extend your right wrist, and you are going to flex, or bow the left wrist.
The forearms rotate to flatten the plane while the body stays over the ball. A big problem for novice golfers is standing up with the body, and steepening the arms. We want to do the opposite, flatten the arms and steepen the body.
Understanding the head drop - the spine is a flexible rod of a fixed length. When you go to the top of the swing, this is going to lengthen the spine. if you then shift your weight by moving your pelvis 4 inches or so toward the target, then the head will have to drop unless it goes with the hips. The larger the lower body moves backward and toward the target, the more the drop, the more the lower body stays put and goes toward the golf ball, the more the head will rise.
Playlists: Keys To Transition, Beginner Program, STS - Swing Phases
Tags: Transition, Concept
00:00:00,000 --> 00:00:05,000
This concept video is the overview of the transition.
00:00:05,000 --> 00:00:09,000
So the transition is going to be blending the backswing into the down swing and that's
00:00:09,000 --> 00:00:11,000
why we call it the transition.
00:00:11,000 --> 00:00:17,000
Now, we describe it as the transition, but really there is a transition for my feet,
00:00:17,000 --> 00:00:22,000
for my hips, for my trunk, for my core, for my arms, for the club, and these are all
00:00:22,000 --> 00:00:23,000
slightly different times.
00:00:23,000 --> 00:00:28,000
So that's why we don't like to describe just a top of backswing position.
00:00:28,000 --> 00:00:32,000
We'll train that occasionally, but the movement should be more of a blend from a backswing
00:00:32,000 --> 00:00:33,000
to a down swing.
00:00:33,000 --> 00:00:39,000
Similar to if I was throwing a ball, there's no real finite end and start on the down.
00:00:39,000 --> 00:00:42,000
It's kind of this blend from back to through.
00:00:42,000 --> 00:00:46,000
So to execute a proper transition, there's a few key movements that we want to pay attention
00:00:46,000 --> 00:00:47,000
to.
00:00:47,000 --> 00:00:51,000
The first one is going to be getting my weight into my left side.
00:00:51,000 --> 00:00:54,000
Similar to when I'm throwing a baseball or hitting a baseball or hitting a tennis shot or
00:00:54,000 --> 00:00:57,000
basically any rotational sport, I'm going to shift my weight
00:00:57,000 --> 00:01:02,000
onto that or my pressure onto that front foot before I then rotate around it.
00:01:02,000 --> 00:01:05,000
It's very hard to throw before you step.
00:01:05,000 --> 00:01:06,000
Golf is no different.
00:01:06,000 --> 00:01:10,000
So one of the first things we're going to try to do is we're going to try to get our weight
00:01:10,000 --> 00:01:14,000
over this left leg or into this left side.
00:01:14,000 --> 00:01:18,000
Pretty much before those arms reach parallel to the ground, kind of like so.
00:01:18,000 --> 00:01:24,000
So it's a very kind of quick and subtle movement to get that weight into that left side.
00:01:24,000 --> 00:01:29,000
Now during that same movement in order to maximize that pressure, my left shoulder is actually
00:01:29,000 --> 00:01:31,000
going to continue to work down.
00:01:31,000 --> 00:01:37,000
Now this is actually a side bend movement, but most of you will feel just like your chest
00:01:37,000 --> 00:01:39,000
stays closer to the ground kind of like so.
00:01:39,000 --> 00:01:44,000
Where if I face this way, you can see that movement right there.
00:01:44,000 --> 00:01:50,000
That movement like this helps prepare my legs for what I want to do during the release
00:01:50,000 --> 00:01:53,000
to kind of maximize my body's capabilities.
00:01:53,000 --> 00:01:59,000
So while my lower body is leading this transition and while my body is kind of preparing,
00:01:59,000 --> 00:02:01,000
my arms have two key roles.
00:02:01,000 --> 00:02:06,000
The first one is they're going to flatten slightly and the second one is they're going
00:02:06,000 --> 00:02:08,000
to try and start squaring the club face.
00:02:08,000 --> 00:02:13,000
So essentially what's going to happen is from the top of the swing as I'm shifting and getting
00:02:13,000 --> 00:02:20,000
into that position, my arms are going to apply a slight flattening move towards the club.
00:02:20,000 --> 00:02:26,000
Now what happens is then when I go during the release, if I applied this flattening move,
00:02:26,000 --> 00:02:32,000
it actually helps square the club face where if I pull it straight down on plane, now when
00:02:32,000 --> 00:02:37,000
I pull in, it's not going to close the club face nearly as effectively.
00:02:37,000 --> 00:02:41,000
So the second piece that we're trying to do, one is the flatten and two is squaring the
00:02:41,000 --> 00:02:45,000
club face, which is the movement that I refer to as the motorcycle move.
00:02:45,000 --> 00:02:53,000
So TPI is probably the biggest proponents or they did the initial research on this 3D stuff.
00:02:53,000 --> 00:03:00,000
And one of the things that we saw was that that left wrist is going to go like this or
00:03:00,000 --> 00:03:04,000
almost like it's giving a motorcycle gas in reverse.
00:03:04,000 --> 00:03:09,000
What that does is that essentially helps close the club face so that now that club face
00:03:09,000 --> 00:03:13,000
isn't a closed position and that can have shaft lean and the club face is still pointed
00:03:13,000 --> 00:03:14,000
at the target.
00:03:14,000 --> 00:03:18,000
If I don't do that movement, then typically during the release, I'm going to make some major
00:03:18,000 --> 00:03:23,000
adjustments in order to try to account for that in order to square the club face.
00:03:23,000 --> 00:03:25,000
So the quick recap.
00:03:25,000 --> 00:03:28,000
During transition, we're going to get into that left side.
00:03:28,000 --> 00:03:32,000
We're going to compress against the ground or use that left shoulder to kind of help
00:03:32,000 --> 00:03:34,000
get my core involved.
00:03:34,000 --> 00:03:37,000
We're going to flatten the arms and we're going to start squaring the club face.
00:03:37,000 --> 00:03:42,000
All of that is going to get us ready for what our body is going to do during the release.
00:03:42,000 --> 00:03:46,000
For details on each piece, check out all the drills here in this section.