Tyler Ferrell is the only person in the world named to Golf Digest's list of Best Young Teachers in
America AND its list of Best Golf Fitness Professionals in America.
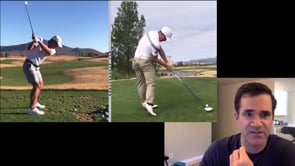
Meet your new instructor.
Subscribe now to watch the full video.
In this analysis video, we discuss what makes a quality back swing movement, and what are the signs that something critical is off. We will cover the movements of the body, and the arms, and how they work together to correctly and consistently get you prepared for a proper transition.
Playlists: Swing Analysis Videos, Beginner Program
Tags: Backswing, Analysis, Concept, Intermediate, Beginner
00:00:00,000 --> 00:00:05,000
In this analysis video, we're going to look at the back swing.
00:00:05,000 --> 00:00:11,000
So this is the first movement of the golf swing and it basically goes from set up position,
00:00:11,000 --> 00:00:15,000
which we've talked about over here on the left, all the way up to the top of the swing,
00:00:15,000 --> 00:00:17,000
which you can look at on the right.
00:00:17,000 --> 00:00:19,000
Now we're going to divide it into two sections.
00:00:19,000 --> 00:00:23,000
First, this is going to be the takeaway, which ends roughly when the shaft is about parallel
00:00:23,000 --> 00:00:28,000
to the ground and following will be setting the club, which you'll see over here on the
00:00:28,000 --> 00:00:36,000
left, from takeaway position until you go into transition.
00:00:36,000 --> 00:00:41,000
Now the takeaway position or the takeaway movement is going to be controlled mostly by
00:00:41,000 --> 00:00:43,000
the big muscles of your body.
00:00:43,000 --> 00:00:47,000
And then between the takeaway and setting the club is when the smaller muscles of your arms
00:00:47,000 --> 00:00:49,000
start to get a little bit more involved.
00:00:49,000 --> 00:00:56,000
So first, we'll cover the takeaway and then we'll cover the setting the club.
00:00:56,000 --> 00:01:00,000
So in theory, the takeaway is one of the easiest moves that we do in the golf swing.
00:01:00,000 --> 00:01:06,000
It should simply be a rotation of the spine to bring the club into this waist-type position.
00:01:06,000 --> 00:01:11,000
Essentially, you're not going to do very much with your arms and hands at all.
00:01:11,000 --> 00:01:14,000
And the way that we can look at this or the way that we can check this is if we were
00:01:14,000 --> 00:01:20,000
to extend the line out from your shirt buttons, you would see that the hands would roughly
00:01:20,000 --> 00:01:23,000
be somewhere in that space.
00:01:23,000 --> 00:01:31,000
So if Iron Man had his light shining, they would pretty much be pointing at your hands.
00:01:31,000 --> 00:01:34,000
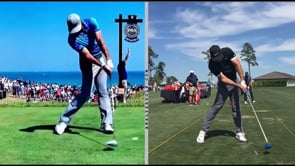
Here we can watch Justin Rose with both the driver and the Iron.
00:01:34,000 --> 00:01:40,000
And as we go through this movement, you will see that there is a slight shift back of the
00:01:40,000 --> 00:01:43,000
upper and lower body.
00:01:43,000 --> 00:01:45,000
The lower body is going to be lester-matic.
00:01:45,000 --> 00:01:50,000
It happens typically a little bit more during the set of the club.
00:01:50,000 --> 00:01:54,000
But if you were to look at the center of the shirt in the center of the chest, there will
00:01:54,000 --> 00:02:02,000
be a slight shift about a half inch away from the target.
00:02:02,000 --> 00:02:09,000
Now we'll take a look at a few amateurs to see where this move can go wrong.
00:02:09,000 --> 00:02:14,000
So as we start going back, you'll see the club gets roughly in that same shaft parallel
00:02:14,000 --> 00:02:16,000
and pointed in the target line.
00:02:16,000 --> 00:02:20,000
But you can see that his chest is still pointed more out towards the ball instead of at
00:02:20,000 --> 00:02:21,000
his hands.
00:02:21,000 --> 00:02:27,000
If we look from the face on view as he goes through that movement, you'll also see him
00:02:27,000 --> 00:02:29,000
get to the outside of the foot.
00:02:29,000 --> 00:02:33,000
So watch the angle in the knee or watch kind of this general area as he goes through that
00:02:33,000 --> 00:02:35,000
movement.
00:02:35,000 --> 00:02:40,000
And you'll see that the knee in the pelvis starts shifting a pretty good amount over onto
00:02:40,000 --> 00:02:42,000
that right side.
00:02:42,000 --> 00:02:47,000
The majority of the weight shift is going to be accomplished mostly through rotation and
00:02:47,000 --> 00:02:51,000
the weight that the pelvis is shaped, not so much through an actual weight shift.
00:02:51,000 --> 00:02:56,000
So I focus more in the second half of the backswing but also here on the early stages of
00:02:56,000 --> 00:03:00,000
keeping the weight and the pressure more on the inside of the foot instead of letting it
00:03:00,000 --> 00:03:03,000
go to the outside of the foot.
00:03:03,000 --> 00:03:07,000
But this has already started a cascade based on what he thinks he needs to do during
00:03:07,000 --> 00:03:10,000
transition and during the release.
00:03:10,000 --> 00:03:14,000
So we don't look at backswing as a cause of problems of the release.
00:03:14,000 --> 00:03:20,000
It's more a sign of what they're going to do on the downswing.
00:03:20,000 --> 00:03:25,000
Here is another golfer demonstrating a little bit more of a lateral movement where
00:03:25,000 --> 00:03:32,000
movement where the swing is controlled mostly by the knees and hips and the arms but not
00:03:32,000 --> 00:03:36,000
doing very much in the actual thoracic spine.
00:03:36,000 --> 00:03:43,000
Here from down the target line you'll see a similar movement where his chest is pointed
00:03:43,000 --> 00:03:45,000
more out towards the golf ball.
00:03:45,000 --> 00:03:51,000
Even though his hands reach that ideal chef parallel and pointed at the target position
00:03:51,000 --> 00:03:55,000
because it's getting there in a way where it's not being driven by the spine.
00:03:55,000 --> 00:04:01,000
He's already setting himself up for some trouble during transition and then ultimately
00:04:01,000 --> 00:04:02,000
the release.
00:04:02,000 --> 00:04:08,000
But again this is a sign of what his brain thinks it needs to do to load what he is going
00:04:08,000 --> 00:04:09,000
to do on the downswing.
00:04:09,000 --> 00:04:14,000
This is not a cause and effects that because he shifted his weight to the outside of his
00:04:14,000 --> 00:04:17,000
foot he only had one option.
00:04:17,000 --> 00:04:22,000
So we look at the takeaway and then we can correct it but not until you fully understand
00:04:22,000 --> 00:04:26,000
the transition and downswing will it all makes sense.
00:04:26,000 --> 00:04:31,000
Now let's start looking at the second phase of the backswing and then we can put it all together.
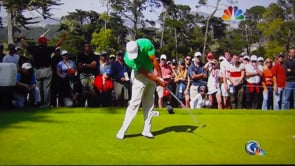
00:04:31,000 --> 00:04:36,000
So during the second phase of the backswing if you look over here at Adam Scott you will
00:04:36,000 --> 00:04:41,000
see that the spine is going to continue rotating as well as extending which I talk about
00:04:41,000 --> 00:04:43,000
in the cons of video.
00:04:43,000 --> 00:04:48,000
At the same time that the spine is bringing the hands up into position the right arm is
00:04:48,000 --> 00:04:55,000
going to begin folding and positioning the hands for what we want to do during the transition.
00:04:56,000 --> 00:05:01,000
We'll look over here at Jason Duffner and you can see he has a little bit of a shorter
00:05:01,000 --> 00:05:07,000
swing but he has gotten into a similar position with his spine.
00:05:07,000 --> 00:05:11,000
So when we're looking at the spine at the top of the swing if you were to draw a line
00:05:11,000 --> 00:05:16,000
down from the back of the neck to roughly the belt line that's going to give you a pretty
00:05:16,000 --> 00:05:23,000
good indication of the amount of flexion or extension in the spine.
00:05:23,000 --> 00:05:29,000
So you'll see is that most good golfers will reach this neutral position where it's a fairly
00:05:29,000 --> 00:05:30,000
straight line.
00:05:30,000 --> 00:05:36,000
Even if you see this golfer here over on the right which is Jason Duffner it looks like
00:05:36,000 --> 00:05:40,000
he has a very short swing and that his chest is stayed pointed down towards the golf
00:05:40,000 --> 00:05:46,000
ball but he has extended his spine back to neutral and got it ready for what we want to
00:05:46,000 --> 00:05:50,000
do during transition.
00:05:50,000 --> 00:05:54,000
Here are a couple more examples so that you can start really visualizing what's happening
00:05:54,000 --> 00:05:55,000
with the spine.
00:05:55,000 --> 00:06:00,000
So as we approach the top of the swing with Graham McDowell over here on the left you can
00:06:00,000 --> 00:06:05,000
see that his spine is still somewhat flex because there's a little bit of a curve right
00:06:05,000 --> 00:06:07,000
there or an angle or a hinge.
00:06:07,000 --> 00:06:12,000
Now as he approaches the top of the swing and starts in that transition you will see that
00:06:12,000 --> 00:06:17,000
he finishes his spine extension to where the point is roughly that straight line that I've
00:06:17,000 --> 00:06:18,000
mentioned.
00:06:19,000 --> 00:06:23,000
Here's another golfer on the right with a camera that moving all over place but there's
00:06:23,000 --> 00:06:30,000
Tommy Gany and you can see that even though he is very much flexed forward from the hips
00:06:30,000 --> 00:06:37,000
which we'll talk about his spine as very much approached and extended or neutral position
00:06:37,000 --> 00:06:40,000
he's lost the curve that he started with.
00:06:40,000 --> 00:06:44,000
That curve is generally going to be replaced by side bend which we'll look at from
00:06:44,000 --> 00:06:45,000
the down the line view.
00:06:45,000 --> 00:06:50,000
But from this face on view you can pay attention to how much the spine has actually
00:06:50,000 --> 00:06:56,000
extended and whether or not the person shifts off the ball or onto the outside of the
00:06:56,000 --> 00:06:59,000
foot.
00:06:59,000 --> 00:07:05,000
During this second phase you will frequently see different looking positions at the top
00:07:05,000 --> 00:07:06,000
of the swing.
00:07:06,000 --> 00:07:12,000
While they're reaching the same rough spine angle or spine position that I'm talking about
00:07:12,000 --> 00:07:16,000
the reason why Graham over here on the left looks like he's very much vertical and
00:07:16,000 --> 00:07:21,000
Tommy over here on the right looks like he's bent over a lot is because of the amount
00:07:21,000 --> 00:07:27,000
of flexion in the knees and the hips and that's a much bigger issue than what's actually
00:07:27,000 --> 00:07:28,000
happening at the spine.
00:07:28,000 --> 00:07:33,000
I'll show a couple examples of amateurs so that you can see what I'm talking about.
00:07:33,000 --> 00:07:38,000
Here you can see Jason Duffner as he's approaching the top of his swing and you can see that
00:07:38,000 --> 00:07:41,000
his spine has reached that straight position.
00:07:41,000 --> 00:07:48,000
Now over here on the left we're going to see a golfer who reaches a similar arm and club
00:07:48,000 --> 00:07:49,000
look.
00:07:49,000 --> 00:07:53,000
He actually goes a little bit further towards parallel.
00:07:53,000 --> 00:07:58,000
If you were to draw that same line from the base of the neck to the belt line you can
00:07:58,000 --> 00:08:01,000
see that his spine is still flexed forward.
00:08:01,000 --> 00:08:08,000
The way that he was able to get the club to reach that high of a position was more from
00:08:08,000 --> 00:08:15,000
a lateral movement of the lower body not so much an extension of the spine.
00:08:15,000 --> 00:08:20,000
Here's another example of an amateur.
00:08:20,000 --> 00:08:27,000
This golfer is a single-digit handicap so he's a pretty skilled golfer but you will
00:08:27,000 --> 00:08:34,000
still see that he reached that actual longer arm position than Jason Duffner while maintaining
00:08:34,000 --> 00:08:36,000
flexion in his spine.
00:08:36,000 --> 00:08:41,000
Now he has a really rigid ribcage so that's going to be something that's a little tricky
00:08:41,000 --> 00:08:42,000
for him to work on.
00:08:42,000 --> 00:08:47,000
Instead what we would typically work on is getting the arms to be a little bit more in position
00:08:47,000 --> 00:08:51,000
and minimizing the shift of the weight into the outside of the foot.
00:08:51,000 --> 00:08:56,000
I just wanted to provide a few examples so that you can see that not everyone who gets
00:08:56,000 --> 00:09:02,000
into the three-quarter position or everyone who gets in the full swing does it the same way.
00:09:02,000 --> 00:09:07,000
And so as a golf smart academy member I want you to start paying attention as you watch
00:09:07,000 --> 00:09:12,000
golf swings for looking for how they're getting into these positions not just what positions
00:09:12,000 --> 00:09:15,000
they're getting into.
00:09:15,000 --> 00:09:19,000
As we look from the down the line view we can focus on a couple other things.
00:09:19,000 --> 00:09:29,000
So let me take both Jason and Brant's Seneca into their takeaway position.
00:09:29,000 --> 00:09:30,000
Just like so.
00:09:30,000 --> 00:09:33,000
And now you'll see very different lower body actions.
00:09:33,000 --> 00:09:37,000
If you look at Brant's Seneca you can see that his lower body is barely moved at all.
00:09:37,000 --> 00:09:42,000
If you look at Jason Duffner you can see that his legs have rotated quite a good bit.
00:09:42,000 --> 00:09:49,000
But they both maintain the alignment of the club pointed in front of the chest.
00:09:49,000 --> 00:09:51,000
Brant Seneca just tends to have a little bit more upright swing.
00:09:51,000 --> 00:09:53,000
Jason Duffner a little bit flatter.
00:09:53,000 --> 00:09:57,000
Neither is better or worse they're just a little bit different.
00:09:57,000 --> 00:10:03,000
So now as we go up towards the top of the swing you'll see that as he completes his shoulder
00:10:03,000 --> 00:10:10,000
rotation the alignment of his spine appears to maintain a pretty consistent angle.
00:10:10,000 --> 00:10:14,000
Now we know that this is a combination of side bend.
00:10:14,000 --> 00:10:16,000
Whoops let's bring it going to go.
00:10:16,000 --> 00:10:21,000
We know that this is a combination of side bend and that loss of flexion that gives that
00:10:21,000 --> 00:10:22,000
gives this appearance.
00:10:22,000 --> 00:10:27,000
And you'll see that his shoulders have turned on an angle there or his spine is rotated on
00:10:27,000 --> 00:10:33,000
an angle that's roughly perpendicular to that initial spine angle that he created.
00:10:33,000 --> 00:10:36,000
We take Jason Duffner up towards the top of the swing.
00:10:36,000 --> 00:10:41,000
And remember he didn't have quite as much hip extension.
00:10:41,000 --> 00:10:46,000
But his shoulder plane is kind of in that same similar area.
00:10:46,000 --> 00:10:47,000
This is a little flat.
00:10:47,000 --> 00:10:50,000
He uses the flatness the shoulder plane to help flatten out his swing.
00:10:50,000 --> 00:10:56,000
Now you'll also notice a very different looking right arm.
00:10:56,000 --> 00:11:02,000
So I don't speak of whether you keep your right elbow up against your chest or whether
00:11:02,000 --> 00:11:07,000
you let it come off away as one of the key fundamentals.
00:11:07,000 --> 00:11:14,000
But I do talk about the rotation of the arms between the take away and setting the club
00:11:14,000 --> 00:11:16,000
as one of the fundamentals.
00:11:16,000 --> 00:11:23,000
So you'll see that as he goes up that right elbow is staying more or less in front of his
00:11:23,000 --> 00:11:25,000
chest.
00:11:25,000 --> 00:11:28,000
And though it's come up off of it.
00:11:28,000 --> 00:11:33,000
As in, if you were to look at his shirt seam or you were to look at his shoulder blade,
00:11:33,000 --> 00:11:37,000
he hasn't let his right elbow drift too far behind his back.
00:11:37,000 --> 00:11:41,000
Same thing you'll see even in an exaggerated position or an exaggerated fashion over here
00:11:41,000 --> 00:11:44,000
with Jason Duffner.
00:11:44,000 --> 00:11:49,000
Now here we have a couple of amateurs that are demonstrating the loss of posture during the
00:11:49,000 --> 00:11:51,000
second phase of the take away.
00:11:51,000 --> 00:11:55,000
So you'll see that as we get to here, he's pretty close.
00:11:55,000 --> 00:12:00,000
His chest is pointing a little bit more towards the golf ball than at his hand.
00:12:00,000 --> 00:12:06,000
So he's he's done a little bit more arm movement than I would like to see.
00:12:06,000 --> 00:12:11,000
But so as a result, the shoulder is pretty much reached the end range of movement and the
00:12:11,000 --> 00:12:15,000
only way he can get elevation is to then stand up.
00:12:15,000 --> 00:12:19,000
So you'll see his ear come back into a second.
00:12:19,000 --> 00:12:23,000
So I'm going to explain angle at the top of the swing as opposed to what he started it.
00:12:23,000 --> 00:12:30,000
Now over on the left, we have a higher handicap golfer and we'll see his ears relatively
00:12:30,000 --> 00:12:35,000
close, but you can see his chest pointing pretty much straight out at the golf ball while
00:12:35,000 --> 00:12:37,000
his hands have gotten into that take away position.
00:12:37,000 --> 00:12:43,000
So we know that he's done that mostly by the arms and then as he goes to finish his backswing,
00:12:43,000 --> 00:12:50,000
you'll see very much he's using the extension of his hips.
00:12:50,000 --> 00:12:56,000
He's using the extension of his legs in order to create this top of the backswing position.
00:12:56,000 --> 00:13:03,000
If you were to have his hips more tilted and his spine a little bit more left side bent,
00:13:03,000 --> 00:13:09,000
instead of this pointing out at the ocean, it would be pointing roughly down at the golf
00:13:09,000 --> 00:13:13,000
ball and he wouldn't have to make his big adjustment during transition in the down.
00:13:14,000 --> 00:13:20,000
The real key takeaway to understanding the takeaway in setting the club is that what you do on
00:13:20,000 --> 00:13:25,000
the backswing gives us insight into what your brain wants to do on the downswing.
00:13:26,000 --> 00:13:31,000
So working on the top of the backswing position or working on how you set the club and how
00:13:31,000 --> 00:13:37,000
you take the club away can help you understand even better what we're then going to do during
00:13:37,000 --> 00:13:41,000
transition, which is going to be the next analysis video that I'll watch you to watch.
00:13:42,000 --> 00:13:48,000
But for right now it's pretty much a simple spine load during the backswing and an arm movement
00:13:48,000 --> 00:13:55,000
that helps set the club at the top of the backswing. I don't want you to be focused on trying to hit
00:13:55,000 --> 00:14:01,000
an ideal-looking position because the movements are much more important than having a picture
00:14:01,000 --> 00:14:04,000
perfect look to the top of your backswing.